Uncategorized

Day 7: Connect our application to a REST API using ngResource

Creating our first resource :-

Initially we are going to write the first resource in a factory format which is similar to a service.


//trimmed code

app.factory("contact", function($resource) {

return $resource("API_URL");

});

//trimmed code

This resource helps to manage all the CRUD operation on the API. Next we will inject the contact resource into ContactService. In the app service for the object self we are going to add three additional variables page, hasMore, isLoading and additionally we will add a function called loadContacts which is going to get the data from rest api url.

Screen Shot 2016-06-24 at 7.04.28 pm.png


Setting up ngInfinite Scroll :-

ngInfinite  Scroll is a third party application. we add the dependency in both index.html and main.js. After adding dependencies we all add the infinite-scroll directive to table tag with function loadMore() and infinite-scroll-distance of 3.

code:-  https://github.com/praneethkumarpidugu/angular1-core/commit/2c93783aa1d47bf3b2e40c0a5dd378c436131ab6

Implementing pagination :-

Here we will connect the loadMore function on controller to loadMore on service. Every we reach the bottom of the page a request is hitting to api which we dont want.

code:-  https://github.com/praneethkumarpidugu/angular1-core/commit/e8437d9919cece2f3a0c0c645807e1fe85131664

Angularjs

Day 6: Communicating between controllers using services and connect our application a REST API using ngResource

Breaking out the list application into two controllers :-

Reformatted both List Column and detail column. Added new controller description to both columns as PersonListController and PersonDetailController. In main.js, modified PersonsController to PersonListController and added a new controller as PersonDetailController. When I tested out by clicking on row they are getting highlighted, ordered but its binding to details column is broken. In the next section we will bind the data with two controllers using $rootScope.

code :- https://github.com/praneethkumarpidugu/angular1-core/commit/c352be272a7f5559661eec03ce533be0bb0215bc

Sharing data between controllers using $rootScope :-

In index.html, for PersonDetailController, it is selectedPerson of PersonListController which isn’t binded. One of the solution is to add $rootScope as argument to PersonListController function and change the selectedPerson scope from $scope to $rootScope. This works now! But angular-js community says that this kind of approach pollutes data and a better way is to use services.

code:- https://github.com/praneethkumarpidugu/angular1-core/commit/bfc2518a6d1cce9f5b3730d870276ad312bb5454

Sharing data between controllers using Services :-

List of angular js services with detail are here in this link.

First Service:-

After module definition we will add define the service as below:-


app.service('ContactService', function() {

});

At the end of main.js, we will delete the persons array and insert it into services. Also we can add functions to the services.

Consuming our service in our controllers :-

Here in this sub section we will inject the service we created into controller. We approach this by adding it as an argument in PersonListController function. When we run the index.html, we see that persons data is not getting rendered.

Screen Shot 2016-06-23 at 2.14.47 pm.png

We fix this by adding persons scope variable in PersonListController by assigning it to ContactService.persons. And the data is loading now.

Screen Shot 2016-06-23 at 2.18.07 pm

But the selected row is not working. To fix this we will go back to index.html and change selectedIndex of background-color to person.email == selectedPerson.email. Next we will add the selectedPerson scope variable in PersonListController by assigning to ContactService. Add the same selectedPerson scope variable in PersonDetailController also. When we try to test details panel is still empty if we select on rows. To see the issue whether the data is binding in both controllers, we could use ng-inspector and clearly shows that selectedPerson is rendered in PersonListController.

Screen Shot 2016-06-23 at 2.26.48 pm.png

We could also see if PersonDetailController is getting data or not in selectedPerson scope variable.

Screen Shot 2016-06-23 at 2.29.39 pm.png

We notice from the above screenshot that selectedPerson is null. To fix this we will use dot notaion to bind selectedPerson. Firstly, inside the PersonListController we add a new scope variable which is getting directly binded with ContactService. We remove the selectPerson completely from PersonListController. In the Index.html, in ng-repeat directive we are not looping through the persons but contacts.persons and replaced selectedPerson with contacts.selectedPerson in all places (used command+R). Finally we will bind person to contacts.selectedPerson at ng-click directive. Test results show that in both ng-inspector and details panel it passed by showing selectedPerson details.

code:- https://github.com/praneethkumarpidugu/angular1-core/commit/e66ca27ce674b9220888e7728f1ef26d8eb1c56d


Connect our application to a REST API using ngResource :-

What are resources ?

Previous we have seen angular-js uses $http service to consume api requests and the api is CRUD application (Create, retrieve update and delete). angular has another system which is called ngResource, which takes care of lot of boilerplate code which we normally if we use $http service. Firstly we have to add it to our application and we will install using bower. We will add minified angular-resource path in index.html. Secondly, we need to add this to the dependencies section in main.js module definition.

code:-https://github.com/praneethkumarpidugu/angular1-core/commit/ef442fab9219e6c2e3dcc0507308dd4884305437

 Configuring AngularJS resources :-

Firstly we will setup the $http service which is required for ngResource.  In main.js, we will write app.config function to configure the application(config is normally called before controller, $http service requests).  In Angular-js, services have factories such as $httpProvider which creates $http service. Here in the config, we will add the authorization of $httprovider with header of token.


//httpProvider is the factory of service which provides $http services.

app.config(function ($httpProvider) {

$httpProvide.defaults.headers.common['Authorization'] = 'Token TOKEN_NUMBER'

});

additionally only for the above example, we will use $resourceProvider by  a setting which will remove trailingslashes from the api data.

code:- https://github.com/praneethkumarpidugu/angular1-core/commit/03c6870ae79e1014f04522c8782fdcc54ee688f9


Angularjs

Day 5 angular-js $scope, services

Understanding Scope: Child Scope :-

We can have controllers that nested inside ParentControllers. In  the index.html, we will nest the ChildController from main.js inside Parent Controller div element. In the index.html, we control the parent controller $scope variable function from child controller div element.

For example:-

main.js:-


var app = angular.module('codecaraft', []);

app.controller('ParentController', function($scope) {

$scope.name = "Parent";

$scope.reset = function() {

$scope.name = "Parent";

};

});

app.controller('ChildController', function ($scope) {

});

In Index.html, we are going to call the reset $scope variable of parent controller inside div element of childController.

<pre><!-- trimmed code --></pre>
<pre>
<div class="parent"
     ng-controller="ParentController" >
   <label >
      <input type="text"
             ng-model="name" />
   </label >

{{name}}

<div class="child"
   ng-controller="ChildController">
   <!-- reset is on parent controller -->
   <button class="btn" ng-click="reset()">Reset</button>

{{name}}

</div>

<!-- trimmed code --></pre>

In addition we test out the functionality by adding an input text field inside childcontroller and there raises an issue. data is binding from parent to child but when we make any change in childcontroller, binding is broken. To see inspect what happened we will use ng-inspector chrome plugin.

Screen Shot 2016-06-22 at 4.46.16 pm

We see from above that when we type in parent controller input area childcontroller is empty in ng-inspector panel. But when we try to change the childcontroller input field. Here is the interesting thing happened.

Screen Shot 2016-06-22 at 4.48.05 pm.png

Child controller has created its scope variable under its scope.

code:- https://github.com/praneethkumarpidugu/angular1-core/commit/50f01964abe40801811303dfe90de90ca17b02a3

Understanding Scope: Root Scope :-

root scope exists on top of any controlle i,e top-level. For trying out, in index.html under div class of container we will declare root controller.  In front-end, if we type anything in root scope it implies both parent and child controller and in-turn if we type in parent controller, it instantiate its own scope with child controller and goes on.  Also to access the rootscope we could do it from controller by injecting $rootscope as argument in the controller. If we declare $rootScope with a name all the above fields gets same value from $rootScope.

code :- https://github.com/praneethkumarpidugu/angular1-core/commit/855b0f8e2939381a6b922291a998faa8d3959bd1

Understanding Scope: The Dot Notation :-

dot notation helps to bind from child scope  to parent and instead of binding scalar values it will bind properties of objects. If we test we see that all the input field are binding with dot notation and properties of object inheritance works. But when you try to give input from child scope variable, data is binded individually.

code:- https://github.com/praneethkumarpidugu/angular1-core/commit/811766eeca684211bd9c37c080ac3c6584fa3d57


Angularjs

Day 3, 4: Angular-js Creating a list application with searching and sorting

Looping in Angular-js :-

Good Morning! Guys today I will be focussing to build a contacts app with fake data. Initially we will be setting up main.js with barebones which register the app module, controller and add the resp names to html tags. Then we will create a table border for the contacts list in html. Using ng-repeat we will loop through all the elements  in array persons of controller “$scope.persons”.

code:- https://github.com/praneethkumarpidugu/angular1-core/commit/658bcf355cd28f84b28db0c6d34e71656aeeea16

Handling clicks :-

Currenly the table is just rendering and we wanted to add dynamism to the table. we will start by highlighting the row when we click on it and for this purpose we will use a new directive called ng-style. But when we include simple ng-style inside all the rows tags it will simply render graybackground for all the rows. to produce gray background only when we click on it we will use ng-click with the function selectPerson and $index as arguments. Back in controller declare the $scope with selectPerson and start the index with null as selectIndex of $scope. Normally we need if then else statement in html to display backgroung-color only when we click on the row. We will use turn-reopertor, like ‘background-color’: $index == selectedIndex ? ‘lightgray’ : ”

code:-https://github.com/praneethkumarpidugu/angular1-core/commit/f363f6bc129387ef10c1a8b395aa6c733e4942e8

Showing details when clicking on a row :-

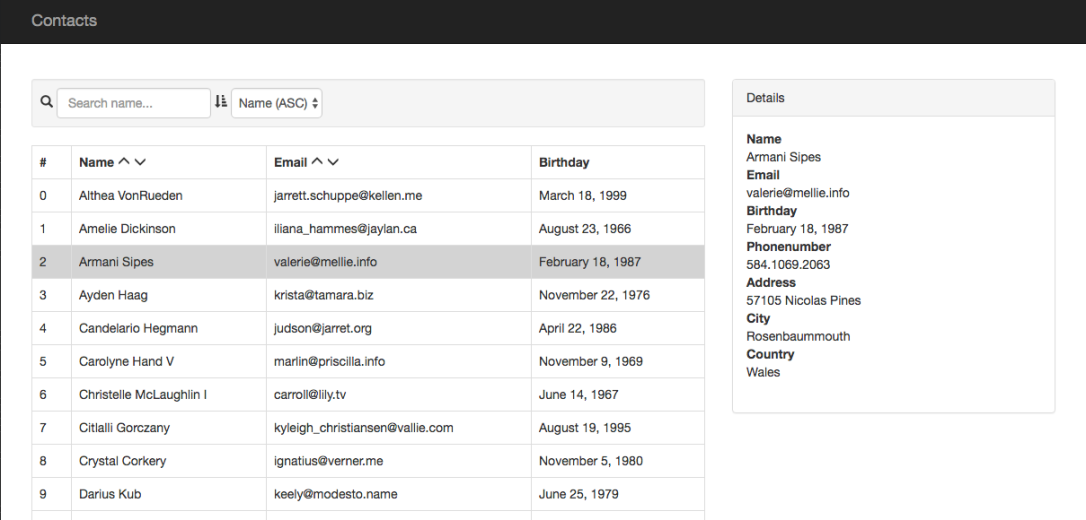
Currently in the homepage it simple shows name, email, birthday and if you compare with main.js it has all other details. Now we will try to create a panel which will display more details.  On the left side we have use col-md-8 to display table and on the right side we have used col-md-4 to display panel. Hence when we click on the row, we need to display the details of that particular person in the panel on the right side. In the main.js, in the scope of selectPerson we have added another scope inside the function as selectedPerson which we have iniatialized as null and then person. Back in index.html, we will display it with selectedPerson and retreive name, email, birthdate, phonenumber, address, city, country. In index.html, under col-md-4 div we will use dl, dt, dd tags to arrange the data.

code:-https://github.com/praneethkumarpidugu/angular1-core/commit/566be992276630cb5e38e2dab593fa0e22f94486


How to implement client side searching :-

On top of the table, we will have a search controller to search the table items by row . Hence we create another div class of row above table with two search forms: “search name…” and “search email…”. To add functionality to search forms, we will go back to controller and add another $scope variable called search and we will bind this search with name and email in index.html. Search out only filtered objects, in table row we will filter the persons by search object. Now currently we have two forms to search, one for name and another for email. To reduce this search into one form, we will declare ng-model with search.$ which will search any text match. Now it searches in a case-insensitive way, for example if I type anything it searches even the middle of text and which I dont want. Angular has a filter called sensitiveSearch which we will replace for simple search filter in the table row and remove $ from ng-model. Back into main.js we will write another $scope variable function called sensitiveSearch with if statement to search for exact string.

code:-https://github.com/praneethkumarpidugu/angular1-core/commit/66edf6e2fc2538e50b2e90d93ca1a482f1a7963c

How to implement client side ordering :-

We will try to sort all the table entries in ascending and descending order. For this purpose to achieve we will use filter orderBy by string. The result in fron-end is all the list is sorted based on alphabetical order of email orderBy: ’email’ and for descending order ‘-email’. Next thing we try to display cols by ascending descending name like a select box.  we will add the ng-model of order in select tag and in main.js as a new $scope variable.Finally we will replace orderBy: ’email’ with orderBy: order which is new $scope variable which we have defined. The result shows friendly select box. But we would like to add up and down arrow as a select next colomn names name, email with help of order $scope variable inside ng-click and span class glyphicon.

code:- https://github.com/praneethkumarpidugu/angular1-core/commit/33da8d7a9acc49ed569bc7b44adc0bf30dbcdd2d

User feedback :-

We have a bug in the previous commit. If we select a row and see the pre tag json data it shows the selected row. But once we delete text from search it still shows the old json data with first row of different data selected. To fix this instead of comparing index with selectedIndex we will compare person email with selectedPerson email and if its true backgroung-color highlights and clean the data we will remove $index from selectPerson of ng-click. From main.js we will selectedIndex $scope variable from controller.

For userfeedback we will use ng-show directive with bootstrap alert.

code:-https://github.com/praneethkumarpidugu/angular1-core/commit/ae60dbba0f4b89eae3f7d890eeeec27b9cfb1599

Angularjs

Day 2: Angular-js Controllers, modules, directives

Angular js controllers:-

ng-controller:

ng-controller is child of core ng module of angular js. ng contains directives, services/factories, filters, global API’s. ng-controller normally connects the controller class to the view. ng-controller directive specifies a controller class; this class contains business logic behind the application to decorate the scope with functions and values.

Lets look at the example below :-

</pre>
<pre><!DOCTYPE html >
<html lang="en"
      ng-app="minmax" >
<head >
   <title >Controllers</title >
   	<link href="../libs/bootstrap/dist/css/bootstrap.min.css"
         rel="stylesheet" >
   	<link href="main.css"
         rel="stylesheet" >
</head >

<body >

<nav class="navbar navbar-inverse navbar-fixed-top" >

<div class="container" >

<div class="navbar-header" >
         <a class="navbar-brand"
            href="/" >Controllers
         </a >
      </div >
   </div >
</nav >


<div class="container main-content" ng-controller="MinMaxCtrl">

   <form >

<div class="form-group" >
         <label for="name" >Name</label >
         <input type="text"
                class="form-control"
                ng-model="formModel.name"
                id="name" >
      </div >


<div class="form-group" >
         <label for="email" >Email</label >
         <input type="email"
                class="form-control"
                ng-model="formModel.email"
                id="email" >
      </div >


<div class="form-group" >
         <label for="password" >Password</label >
         <input type="password"
                class="form-control"
                ng-model="formModel.password"
                id="password" >
      </div >


<div class="form-group" >
         <!-- We are going to to pass the ng-click the name of
         function
         It will capture anyclick on the button and it will call
          the onSubmit() function on our controller (MinMaxCtrl)-->
         <button class="btn btn-primary">Register
         </button >
      </div >

   </form >
   <!--Just to visually see in the page whats happening
    we are databinding the formModel scope variable
    To see more neatly we will use pipe character | and the
    word json
    In angular we call this as filters.-->

<pre>{{ formModel | json }}</pre>
</div >

<script src="../libs/angular/angular.min.js" ></script >
<script src="main.js" ></script >


</body >
</html ></pre>
<pre>

styling part


<pre>body {
  padding-top: 50px;
}
.main-content {
  padding: 40px 15px;
}</pre>

business logic for understanding controllers

<pre>//we are storing the angular module in a variable called app
//in module param1: name of the module, param2: list of dependencies.
var app = angular.module('minmax', []);

//controller
//param1: name of the controller
//param2: function and first param of function is a special variable called $scope
//         anything we add to scope variable we can actually databind to in the HTML
app.controller('MinMaxCtrl', function ($scope) {
    $scope.formModel = {};//After you declare here we can bind this in html.
});</pre>

Screen Shot 2016-06-19 at 2.39.07 pm

Currently when I tried to click register nothing happens. what I would like to do is to do:When I click on register the data should be stored in a server. One way to do is to introduce a directive called “ng-click”. It will capture anyclick on the function(onsubmit()) and call the declared function on the controller. In app.js, we will adding our onSubmit() function in our controller.


<!--trimmed code --></pre>
<pre>
<div class="form-group" >
      <!-- We are going to to pass the ng-click the name of
      function
      It will capture anyclick on the button and it will call
       the onSubmit() function on our controller (MinMaxCtrl)-->
      <button class="btn btn-primary" ng-click="onSubmit()">Register
      </button >
   </div >

</form >
<!--Just to visually see in the page whats happening
 we are databinding the formModel scope variable
 To see more neatly we will use pipe character | and the
 word json
 In angular we call this as filters.-->

<pre>{{ formModel | json }}</pre>
</pre>
<pre><!--trimmed code --></pre>
<pre>


app.js:-


<pre>//trimmed
$scope.formModel = {};//After you declare here we can bind this in html.
$scope.onSubmit = function () {
    console.log("Hey I'm submitted!");
    //we could also actually log our actual formModel
    console.log($scope.formModel);

};
//trimmed</pre>


Screen Shot 2016-06-19 at 3.00.10 pm


Submitting a Form using $http :-

To actually send a HTTPRequest,  the first thing we need to  inject the httpService into the controller. In the controller declaration we will add the $http and we will post to the endpoint with the data we want to send. Optionally we will use success handlers to log 🙂 for success and 😦 for error condition.

For the detailed code with changes :- https://github.com/praneethkumarpidugu/angular1-core/commit/8c02bb2d043f060bf49c93e62946611561de7266

Note: Read the comments for more explanation in the code.

Form validation using HTML5 :-

In the previous commits we have made the form to show some console messages if we click on register. Here will do a bit validation to the input fields. we will do this by HTML5 form validation which means that browser itself performs the validation. We will trigger it with the help of “required “flag in the tag. By testing out few times we still see that the form is getting submitted even after validation as we defined with ng-click in register button. To fix this we will use delete ng-click and we add a type of submit inside the form which will trigger standard form submission rule. To capture the form submission we will type in the new directive called ng-submit in the form tag with the function we want to call.

for detailed view of code :-
https://github.com/praneethkumarpidugu/angular1-core/commit/9c5c88e8048aac3285d1b23c325d2c1516f0bab8

The advantage of using html5 is that its quick. But no user feedback, custom messages and hence with angular we could do a bit better.

Form validation using Angular JS :-

To tell browser not to use any HTML5 trigger validation, In form tag we will novalidate flag. Now our log is getting called by clicking on register button. Give a form a name which angular could use to trigger validation. Just to look at our form with validation data we will replace pre tag from formModel to theForm(name of the form) and observe in the browser which will show a big stack of data. We could observe that it doesn’t show the validation for input fields of the form. To fix that, we will add the name to the input field. we will try out by naming email, sex. Now you see different json data for email and sex. But the form still gets submitted if we click on register. To fix this again in the form tag for ng-submit flag we will pass the variable theForm.$valid where $valid is from json data we found in the browser which is true only if the form is valid. In app.js, for scope of onSubmit in controller will declare the parameter with valid and if its valid we will output the log with message and else we will log it as “Invalid”. When you test out by clicking on register it will show the form as invalid.

To show users more detailed error message for invalid form we will use new directive called “ng-class”. using pre tag we have seen $valid, $pristine, $error and we could show these using another directive “ng-show” with pretty interface. In index.html, below the input field with p tag add a help-block class which will show error messages and ng-show directive equivalent to required flag of $error.

for detailed code:- https://github.com/praneethkumarpidugu/angular1-core/commit/df6eeb9c7973cddee987f5302866f6288425d16e

Form validation using Angular auto validate :-

install angular-auto-validate through bower

bower install -g angular-auto-validate

Include the script file in index.html and include it in dependency section of modules variable.

The difference between previous manual validation and angulat-auto-validate is it doesn’t even call the onSubmit function until the form is valid.

Further for the input validation we will regex pattern from html5pattern.com and use the twitter naming pattern using directive ng-pattern. We will also use min length directive “ng-minlength”. From basic math component we will min and max for age input field. For password field we will again use ng-minlength. Still the error messages we get from the form are not user friendly. Hence we customize the error messages with simple messages for angular-auto-validate.

Here we will hook “run” in main.js where it is called before directives, controller are compiled. Inside the run we will call a function with defaultErrorMessageResolver as parameter which gets error messages and then instantiates another function with errormessages with different key values pairs. Then we will go back to index.html to use directives from angular-auto-validate “ng-min-err-type”,  “ng-max-err-type”, ng-pattern-err-type”.

detailed code:- code link

User feedback buttons using Ladda buttons :-

angular ladda gives user feedback with jquery process animated. http://lab.hakim.se/ladda/ . Next step is to add the relavant links to index.html and the dependencies in main.js module. Now we have a new directive which we could add into our html.

detailed code:- https://github.com/praneethkumarpidugu/angular1-core/commit/abc54ba16b5e72ff222db89edb7315602f98ce76


Angularjs

Day 1:-Sharpening Angular js skills

Time: 10 pm.
Initially gone through the chrome developer tools such as console, network(seeing different types of API requests), debugging through breakpoints, elements, source. I haven’t got enough motivation to go through all the other components of its developer enviroment but got basic idea.

After supper break:-

Time: 12:05 am :- Working out few free code camp challenges:-

Comparision with the strict equality operator:-

strict equality operator is some what different than the equality operator. It check on both the data type and value on the element of both sides (===). For example:-

1 === 1 is true and 1 === “1” is false. you might have already understood the difference. first example on both sides was number data type and same values and where as on the other side it was number data type on one side and string data type on the other side. In equality operator, it normally converts the data type and does the comparision.

challenge:- Use the strict equality operator in the ifstatement so the function will return “Equal” when val is strictly equal to 7.

// Setup
function testStrict(val) {
if (val === 7) { // Change this line
return &quot;Equal&quot;;
}
return &quot;Not Equal&quot;;
}

// Change this value to test
testStrict(7);

Comparision with inequality operator :-

Inequality operator(!=) also converts the datatype as equality operator
but the semantics are different.

challenge:- Add the inequality operator != in the if statement so that the
function will return “Not Equal” when val is not equivalent to 99.


// Setup
function testNotEqual(val) {
if (val != 99) { // Change this line
return "Not Equal";
}
return "Equal";
}

// Change this value to test
testNotEqual(10);

Comparision with the Strict Inequality Operator :-

It doesn’t convert the data types.

challenge:-Add the strict inequality operator to the if statement so the function will return “Not Equal” when val is not strictly equal to 17

function testStrictNotEqual(val) {
if (val !== 17) {
return "Not Equal";
}
return "Equal";
}
testStrictNotEqual(12);

Comparision with greater than operator:-
Like equality operator, greater than operator converts the data type.

challenge:-Add the greater than operator to the indicated lines so that the return statements make sense.


function testGreaterThan(val) {
if (val > 100) { // Change this line
return "Over 100";
}

if (val > 10) { // Change this line
return "Over 10";
}

return "10 or Under";
}

// Change this value to test
testGreaterThan(100);

Comparison with the Greater Than or Equal to Operator :-

Like the greater than operator, this operator also converts the data type
while comparing.

challenge:-Add the greater than or equal tooperator to the indicated lines so that the return statements make sense


function testGreaterOrEqual(val) {
if (val >= 20) { // Change this line
return "20 or Over";
}

if (val >= 10) { // Change this line
return "10 or Over";
}

return "9 or Under";
}

// Change this value to test
testGreaterOrEqual(10);

Comparison with the Less Than Operator :-

Likewise the greater than operator, greater than equal operator, this operator also converts the data type while comparing.

challenge:- Add the less than operator to the indicated lines so that the return statements make sense.

function testLessThan(val) {
if (val < 25) { // Change this line
return "Under 25";
}

if (val < 55) { // Change this line
return "Under 55";
}

return "55 or Over";
}

// Change this value to test
testLessThan(10);

Comparison with the less than or equal to operator :-

this operator also converts the data type while comparison.

challenge:- Add the less than or equal tooperator to the indicated lines so that the return statements make sense.

function testLessOrEqual(val) {
if (val <= 12) { // Change this line
return "Smaller Than or Equal to 12";
}

if (val <= 24) { // Change this line
return "Smaller Than or Equal to 24";
}

return "25 or More";
}

// Change this value to test
testLessOrEqual(10);

Comparison with logical AND operator :-

this operator returns “true” if operands on both sies are true. This effect could be achieved

by nesting an if statement inside another if:

if (num > 5)  {
if (num < 10 ) {
return "Yes";
}
}
return "No";

using the above login with AND Operator.

if (num > 5 && num < 10) {
return "Yes";
}
return "No";

challenge:- Combine the two if statements into one statement which will return "Yes" if valis less than or equal to 50 and greater than or equal to 25. Otherwise, will return"No".

function testLogicalAnd(val) {
// Only change code below this line

if (val <= 50 && val >= 25) {
return "Yes";
}

// Only change code above this line
return "No";
}

// Change this value to test
testLogicalAnd(10);